Eurovan modifications
Another road trip approaching, another round of “improvements” to our 2001 Volkswagen Eurovan Camper. We’re up to 71,400 miles on this baby and we love it more each time we get to use it. During each road trip, we think of things we can do to it to make the next trip better. Thus, the never-ending modifications…
Since my last post about this (Eurovan Obsession, November 12, 2009) we did the GoWesty Lift and Level Kit, which made a big difference in stability and ride. Plus, it’s cool having Mercedes Benz wheels on the van as well as a little more clearance.
Yesterday, I added:
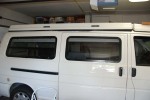
- Yakima 8B Side Rails (Kwik Loaders) so I could put my old crossbars on top and use our Thule Spaceboost or whatever it’s called. We also might put the canoe on top if the mood strikes us to do a float down Big Springs next week (the origin of the Henry’s Fork of the Snake River, in Island Park, Idaho). The hardest part of installing the Side Rails was figuring out where they should go. I tried finding pictures of late model Eurovans with them installed, but could not, so I thought I’d document it in case anyone else wants another user’s input on it. Here in a nutshell, is how I did it:
- I wanted the biggest spread between bars I could get and still easily add the rooftop box I have, which turned out to be about 40″. Then I checked the overall length of the box (ours is 90″) and made sure it wouldn’t interfere with the rear door or roof vent. This put the center of the front bar about 25″ from the front of the poptop.
-
I used the Side Loader as a template to mark the two 5/16″ drill holes for the front rail. The elevation location of the loader rail – at least on this poptop – must rest on the bottom of the curve just above the lower part of the poptop that holds the gasket. Any higher and the inside mounting plate will not fit. I was concerned that the plastic-coated clips on my Yakima towers (which clamp onto the bottom of the Kwik Rail) wouldn’t have enough clearance because of the protruding lip just below the rail, but it just barely clears it when fully tightened (the instructions refer – briefly and vaguely – to this, but since they’re not vehicle-specific you just have to check it on your particular ride).
- Then I measured 40″ back to find the rear location, and marked the drill holes there.
-
Then I checked the inside of each location to make sure the mounting plate would fit; there are structural ribs located inside the poptop ever 12″ or so, which could interfere with your fore-aft location. I had to move my original spot about an inch in the front to avoid hitting one of those ribs.
- Once I had the locations marked and double-checked the measurements to make sure I had the rails set up exactly in the same place on both sides, I started drilling the first two holes. I learned quickly that it is much easier to line up the holes by starting the drill actually through the rail holes. The first two holes I just drilled through my pencil marks, and the bolts were about 1mm too far apart for the inside mounting plate to fit over the bolts. It took some pounding and re-drilling to get the two holes in the mounting plate to slide over the bolts. The tolerances are fairly tight, so it’s much better to get the holes started through the actual holes in the Kwik Rail. I had no trouble with the other three once I figured this out.
- When drilling each hole, I made sure to keep the tent material safely out of the way in case the drill bit flew too far through the poptop. Access on both the front and rear spots was fairly good, but I had to raise and lower the poptop several times for each rail; to avoid having to go inside the van each time I dropped the poptop down and release the latches, I put a 2×6 scrap at the front to keep the lid from going all the way down. This saved a bit of time and energy.
-
After testing the fit of the bolts with the gasket and the inside plate, I removed the assembly and added a small bead of Goo (clear poly auto adhesive/sealant) to the part of the bolt just up against the inside of the gasket.
- Fully gooed, I put the assembly back into the holes, added the lock-washer and nut, and tightened it all up with a 1/2″ socket and ratchet. I checked for tightness on each one, and noticed a small amount of Goo oozed above and below each bolt, as well as a little rubber-squishing of the gasket. Since the poptop is just a huge piece of molded plastic with no insulation or anything to crush, I tightened the bolts fairly tight without worrying too much about damaging the poptop.
Overall, it went pretty smoothly. One thing I added to the setup was a home-made bolt cover for the inside of poptop to protect the tent fabric from getting cut up with the bolts protruding from the nut. I cut two synthetic wine corks into four equal pieces each (total of eight), and then used a 1/4″ drill bit by hand to ream out enough material to be able to “screw” the cork piece onto the end of each bolt. It would have been nice of Yakima to include those flexible plastic caps to cover the bolts and nuts, but in a pinch I hope my method will keep my tent from getting torn… Time will tell.
-
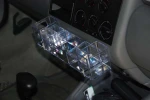
Front dash utility rack: I spent some quality time at Target and found a small organizer to hold our cell phones and other doodads safely out of the way. I used a couple small metal brackets (which I had to modify a little) and the existing screws in the upper part of the lower dash cover to secure this gizmo.
- Two 12-volt outlets – just tapped into the existing outlet. Got these at Radio Shack pretty cheap.
- An iPod/MP3 player cable – tapped through the lower dash cover and held in place with a rubber grommet. If I want to use it I can pull it out at least a couple feet.
- Rear medicine chest cabinet shelf: also from Target, a little organizer tray that I snipped up and screwed in at a slight angle to make the cabinet a bit more user-friendly. Would it have added much more to Winnebago’s conversion to put a little shelf in there? Anyway, I’m thinking this will be a good spot for my toilet bag, which on previous trips was just lumped in there with Windex, paper towels, dog treats, licorice, hand-cuffs, Kim Chee, and an old dog-eared copy of Pride and Prejudice.


Did you install the Go-Westy lift and level kit yourself? I have a 97 Eurovan camper and am thinking about doing this. I noticed that the difference in the 1995-2000 and the 2001-2003 kits is that the 3 spacers vs 1 spacer for the newer yrs.
do you know where the 3 spacers go on the older yr kit?
August 30, 2010 at 4:32 am
Hi – I sent you an email with more information.
August 30, 2010 at 9:04 am
Bob,
I have the same question as Tom. How did the lift/level work go? Did you do it yourself? Do you still have the directions? I’d sure love to read them. I’m considering the same thing.
Markus
November 15, 2010 at 7:11 pm
It went well, but I had a mechanic I know do it. Took him about an hour. The directions from GoWesty are minimal but I can’t find them. The only thing they specify is the height difference between front and rear; I believe the front should be about 1″ lower if I recall.
November 16, 2010 at 5:46 pm
I admire your customizations. Good work.
November 27, 2011 at 10:42 pm
I know you installed Yakima Side Rails. Did you ever try installing the Thule Artificial Rain Gutter mounts on your Eurovan Camper? Do you know anyone who has? If so, I’d like to hear about that experience.
I have a 1999 Eurovan Camper and I’m running into a challenge dealing with the different contours and curves of the pop-top outside and inside surfaces. In short, when I position the mount at the desired location on the outside and the backing plate on the inside, the contours prevent the two plates from aligning — the backing plate ends up being too low so the holes don’t line up. That’s a show-stopper preventing me from installing the mounts at the moment.
I was hoping someone has installed the Thule mounts on a Eurovan Camper and can provide some tips for me. I’m assuming there IS a way to install those mounts on a Eurovan.
Thanks in advance.
Abbo
September 3, 2012 at 12:19 pm
I have a question about a child seat for the eurovan camper – is it easy/quick to install? Is all the hardware in place? Thanks, Martin
March 18, 2013 at 12:30 pm
I never installed a child seat in the camper, but all the hardware is built in for attaching them.
March 18, 2013 at 1:27 pm
I have a question, slightly (largely) off-topic, but you seem like you might know. I want to install a high weight-bearing hook/loop on the inside of my EV, on the post between the front passenger seats and the passenger area of the van. I saw your rivet project and thought that you may have an idea or two about how to do that.
August 16, 2013 at 9:12 am
Sounds like a cool idea. Unfortunately I don’t have any ideas for you, and we don’t have the van anymore (sadly). Good luck!
August 16, 2013 at 10:13 am
A question about the GoWesty lift-kit you installed on your Eurovan. Did that provide sufficient ground-clearance to negotiate moderately rough, uneven backroads? I’m considering buying a late-model Eurovan pop-top camper. However, being a nature writer/photographer (based in Bend, Oregon) I require a sufficiently high-riding rig to go into the boondocks for my field work. I don’t mean extreme 4X4 boulder-hopping—-just accessing remote trailheads where roads aren’t well maintained and often become somewhat eroded. I’m also wondering if that lift-kit gives enough extra wheel-well room to mount 17-inch traction tires? That’d probably add a bit more ground-clearance. Thanks.
January 27, 2014 at 7:29 pm
I wouldn’t advise it. We routinely drove the EVC on well-maintained gravel roads, but the lift kit didn’t add more than a centimeter of clearance. Plus, there’s not any room for bigger tires (look at some of the pictures on the blog and this’ll be clear). We drove it once on a moderately eroded, slightly rough road in the Sawtooths near Stanley, ID, and I swore I’d never do that again; this was a road my pickup would breeze over. The EVC is just too unwieldy, and driving it on stuff like that was too stressful. I vowed to get a used Sportsmobile diesel Ford with a lift on it, but will never have the cash to do that, unfortunately. That’s my opinion; others might disagree, but the EVC is not a good off-road bet for someone who wants to get back there a ways. You might look for a Syncro Vanagon, but make sure you look into the Subaru engine replacement or the one GoWesty does.
January 27, 2014 at 8:16 pm
Thanks for your comments, Bob. So the GoWesty lift-level kit didn’t give your Eurovan any significantly increased ground-clearance, eh? That’s a bit confusing for me. On their website’s page telling about that kit, GoWesty shows comparison photos of two identical EVCs—-one with the kit installed, the other without. The van with the lift-kit is noticeably higher; maybe 2 or 3 inches worth. Also, the wheel-wells are subsequently raised as well. One photo of the non-altered EVC shows a guy only being able to insert two fingers between the top of the tire and edge of the wheel-well. But in the one with the lift he can place his entire fist in there. I was sure hoping you’d reply to say that the GoWesty lift-level kit allowed you to travel rough back roads without disemboweling your EVC. I’ve often seen people drive their Subarus to far-flung trailheads via some fairly bumpy dirt roads, and those small Japanese vehicles certainly aren’t as high-riding as a truck. So I figured a raised Eurovan would be able to do the same. Like you, I’ve considered a 4X4 Ford Sportsmobile, but as you commented, they definitely cost a fortune! Also, they’re larger than a VW van and less maneuverable in tight places. My wife and I love VW pop-top campers, having owned the old air-cooled, gutless “hippy busses” back in the 1960s and 1970s. There’s just nothing else quite like them, being the happy medium size between the too dinky minivans and the huge American vans. And we recently checked out a 1990 Vanagon Syncro camper that GoWesty had totally refurbished a couple years ago to nearly like-new condition. But despite their rebuilt/redesigned, more powerful water-boxer engine and the nice cosmetics, upon test driving it the van still felt rather decrepit in its handling. VW vans have unibody construction with no true frame, so driving them for many years on rough backroads begins to tweak the vehicle until it eventually becomes “creaky” (that’s based on personal experience from repeated jouncing trips into the Owyhee Canyonlands many years ago!) My wife thinks I should just buy a small motorcycle and mount it on the back end of a Eurovan to use when the road becomes impassable. She might indeed have the best solution there!
January 28, 2014 at 12:08 am
Your wife, like mine, has the best solution. The level kit does raise the EVC, but on the left side only, which is overloaded, so it sags to the left without it. The overall height of the van actually decreased a teeny bit when leveled because it dropped the right side by raising the left. Regardless, though, because of its weight, long wheelbase, and asphalt-designed skeleton, there was waaaaaay too much flexing going on whenever we encountered undulating terrain. Sorry to hear about the Vanagon – didn’t realize they were similar to the EVC in handling. There’s no perfect vehicle. My brother-in-law has a 4×4 pickup with a pop-top slide-in camper. He can go wherever he wants, but the mileage is horrible and the thing is still really top-heavy. I like the dirt bike idea. Thanks for sharing that!
January 28, 2014 at 6:48 am